Capture the app
Take screenshots of the actual app with the right language and sample content.

App Store screenshots show people what an app does before they download it. When an app supports several languages and device sizes, keeping those screenshots accurate becomes a release task of its own.
We built a repeatable process for Sisu, our children’s learning app made with Expo, a framework for building mobile apps. We capture the app in each language, add a headline and device frame, check the finished images, and upload the approved set. A change to one screen can then be carried through to every affected screenshot.
This guide explains the process first, then shows the scripts we use. Developers can adapt the scripts to their own app; designers and product teams can use the same review steps.
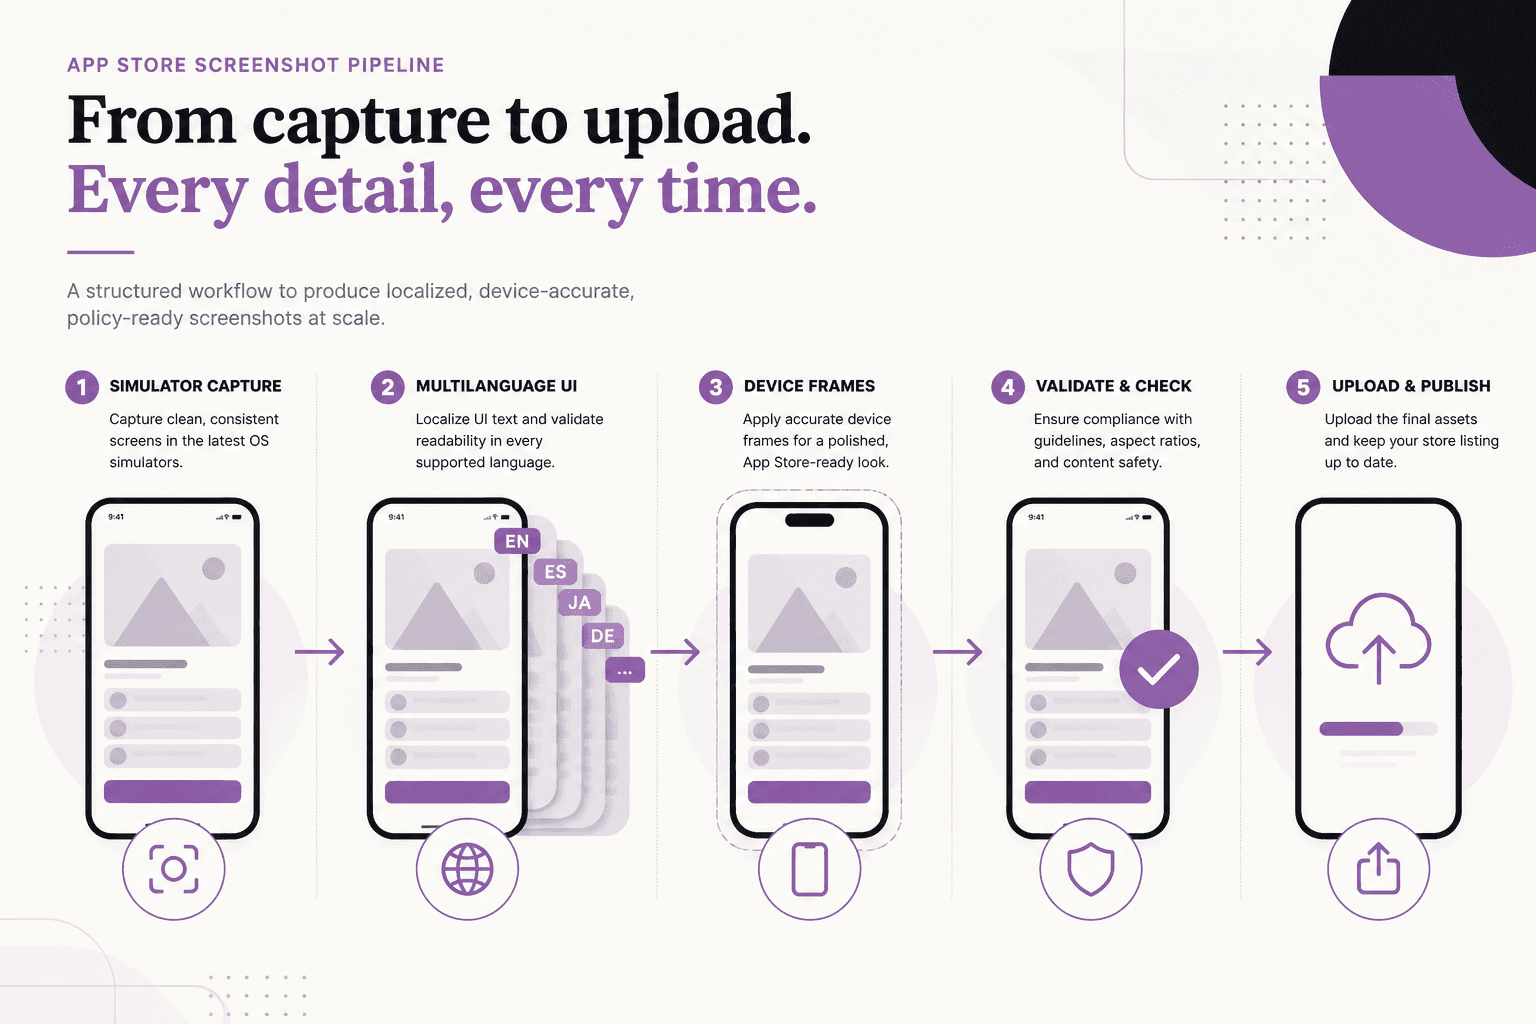
A locale identifies a language and sometimes a region, such as en-US for US English. We prepare screenshots for each supported listing locale and device size:
Take screenshots of the actual app with the right language and sample content.
Place each capture inside a device frame and add a translated headline.
Organize images by listing locale and device size. Check dimensions, text, and layout.
Send the reviewed images to App Store Connect, Apple’s service for managing app releases.
We keep image generation separate from upload. Regenerating a screenshot should produce files for review without changing the live release setup.
Capture the iPhone and iPad layouts separately. Enlarging an iPhone screenshot does not show how the app looks on an iPad.
The following sizes are examples from our workflow. Apple’s requirements depend on the devices your app supports; check the current screenshot specifications before preparing a release.
| Screenshot set | Example portrait size | Our folder name |
|---|---|---|
| iPhone 6.5-inch | 1242 × 2688 pixels | iphone65 |
| iPad 13-inch | 2064 × 2752 pixels | ipad129 (a name retained from our earlier setup) |
An app’s language codes may differ from its App Store listing codes. Our preparation script uses an explicit mapping:
| App language | Listing locale | Meaning |
|---|---|---|
en | en-US | US English |
en-GB | en-GB | UK English |
es | es-ES | Spanish for Spain |
fr | fr-FR | French for France |
pt | pt-PT | Portuguese for Portugal |
hi | hi | Hindi |
ne | No matching listing locale | Nepali previews for internal review |
Nepali is not currently in Apple’s supported listing localizations. Sisu still supports Nepali inside the app. We keep Nepali screenshots for review in a separate folder that the upload step does not read.
Choose regional variants deliberately. For example, Portuguese for Portugal and Portuguese for Brazil need separate entries if you publish both listings.
Use a simulator, a virtual iPhone or iPad running on a Mac, to capture consistent screens. Before each capture, set the app’s language, appearance, and sample content. Use a Release build so developer menus and debugging controls do not appear in the image.
Sisu has a small startup module that reads a screenshot configuration file. The file identifies a supported screen, language, and theme. The app applies the language before opening the screen, which avoids briefly displaying English in a translated capture.
Our setup follows these rules:
The ./scripts/ commands in this post are Sisu-specific helpers. They are not included with Expo or Xcode. They require a configured simulator, an installed app, and the corresponding startup code in the app.
For example, our helper writes the screen settings into the simulator’s app storage and relaunches Sisu:
# Replace SIMULATOR_ID with the target simulator’s unique identifier.
./scripts/plant-shot-route.sh SIMULATOR_ID /home ne light
Here, /home selects the screen, ne selects Nepali, and light selects the light theme. A supported app link, such as sisu://home?lang=ne, can serve the same purpose. Writing the configuration file also works in our automated captures when the Simulator window is closed.
Save unedited captures separately from the finished marketing images. Use names that describe the screen, such as home.png, play.png, and category.png.
Our helper scripts load sample content and capture a language set:
./scripts/seed-shot-content.sh SIMULATOR_ID
./scripts/capture-raw-locale.sh ne
For all configured listing languages, we use:
./scripts/capture-all-store-locales.sh
Keep iPad captures in a separate folder and use an iPad simulator. After an Xcode upgrade, confirm that the saved simulator identifiers still refer to available devices.
We use Koubou to generate finished screenshot images from templates and layout settings. Each image combines an app capture, a device frame, and a short headline explaining one benefit.
Our scripts generate the phone and tablet sets separately:
./scripts/generate-fancy-all.sh
./scripts/generate-fancy-ipad.sh
The word fancy is simply our folder and script name for the finished images.
Translations need their own layout checks. A headline may become longer in another language. Devanagari, the writing system used for Nepali and Hindi, also needs enough vertical space for marks above and below the letters.
We measure text before rendering and store layout settings by language. In our implementation, @chenglou/pretext and node-canvas help with those measurements. Reviewers then check that the headline remains readable and does not overlap the device frame.
Keep the frame style and colors consistent with the app. Give each image one clear message so readers can understand it quickly.
Staging means copying the approved images into folders organized for upload. Our staging scripts map app language codes to listing codes and check image dimensions:
bash ./scripts/stage-asc-screenshots.sh --validate
bash ./scripts/stage-asc-ipad.sh --validate
After every regeneration, review the following:
Automated checks catch file problems. A visual review catches unclear wording, awkward line breaks, and misleading screenshots.
We use asc, the App Store Connect command-line tool, to upload screenshots. Before uploading, authenticate the tool and identify the app version and language you intend to update.
The example below uploads one language for one device type. Replace VERSION_LOCALIZATION_ID with the identifier for that language entry in the app version. It is a resource ID, not a language code such as en-US. See the asc screenshot upload documentation for the lookup commands and current options.
# Run after reviewing the images and confirming the target app version.
# --replace replaces the existing set for this locale and device type.
asc screenshots upload \
  --version-localization "VERSION_LOCALIZATION_ID" \
  --path ./screenshots/asc/iphone65/en-US \
  --device-type IPHONE_65 \
  --replace
Repeat for the other approved language and device sets, using their matching identifiers and device types. Check the uploaded images in App Store Connect before submitting the version.
Keep authentication keys out of the repository. Document how to configure access without putting private key contents or machine-specific secret paths into tracked files.
The folder structure should make the purpose of each file clear. Our structure separates original captures, templates, finished images, and upload-ready files:
screenshots/raw/{lang}/
screenshots/raw-ipad/{lang}/
screenshots/koubou/                 # Templates and translated headlines
screenshots/fancy/iphone65/{lang}/  # Finished phone images
screenshots/fancy/ipad129/{lang}/   # Finished tablet images
screenshots/asc/iphone65/{locale}/  # Upload-ready phone images
screenshots/asc/ipad129/{locale}/   # Upload-ready tablet images
Record the commands, language mappings, simulator settings, and review steps in the repository’s documentation. If coding assistants use the repository, include the relevant instructions in AGENTS.md too.
For the app build process that goes with these screenshots, see how we build Sisu with Xcode Cloud.
If the app supports the listing language, capture its translated screens too. Readers should see the interface they will use after downloading the app.
The screenshots help us review Sisu’s Nepali interface and lesson content. We keep them outside the upload folders.
Prepare the screenshot sets Apple requires for your supported devices. Capture the actual iPad layout instead of stretching a phone image.
Capture the affected screen in each relevant language and device size. Regenerate its finished images, stage them, and review the updated sets before uploading.